Strawberry Gâteau de Crêpes

>> Sunday, July 28, 2013


It all started with a “I’m not in a mood for the usual cakes” type of gchat conversation with my sister whose taste buds have changed drastically ever since she started eating for two. 
 
“But make me something different, I'm craving for something sweet”.


Being at work, I tried to recall what I have in the pantry and fridge at home. Have they invented a refrigerator with scanners attached telling me what I have in stock at the touch of my mobile app? Mental note to self - if not, must look into it when I get home and patent the idea asap.

When I did get home, I acknowledged that ideas I come up with at work are sometimes not the best and I also decided to make a crepe cake. That was the better of the two.

 
This strawberry crepe cake is something that can be made with your usual kitchen staples...and some strawberries of course. I found out that in Australia, strawberries are in season today and everyday as they are farmed around the country in different climatic regions. How lucky we are living here!


This cake reminds of my childhood. When I was a young girl, I was never into cakes or desserts. Until one day, I walked past a fancy cafe in a department store in Taiwan and my eyes caught sight of a very similar strawberry crepe cake - it was the most beautiful cake I'd ever seen. I could not even begin to count how many even layers of golden soft crepes were sandwiching the ruby red strawberries sliced with such precision and the oozing pale cream. And so I just stood there, eating with my eyes until my mum whisked me away to run some errands.
 
I did go back to the same place a few years later. It certainly didn't taste as good as I had it in my head after all those time. But I can assure you that this one here, 20-something years later, definitely tastes like what it should have (although it does not look as good - the pastry cream did not have time to set in the fridge!)


These crepes are easy to make - you don't even need a crepe pan. I used my normal pan/wok and just measured the batter (1/3 cup) to make sure each layer is the same size.  The sweet, juicy and tart strawberries and the not-too-sweet pastry cream makes for the best paring. I made the crepe batter and the pastry cream the day before, making the assembling day a breeze!


Note: I cut the recipe below down completely by 2/3, resulting in around 10 crepes!

Strawberry Mille Crepes Cake (Gâteau de Crêpes)
Adapted from New York Times who adapted the batter from ”Joy of Cooking” and the pastry cream from ”Desserts,” by Pierre Herme and Dorie Greenspan. 

For the crepe batter:
  • 6 tablespoons butter
  • 3 cups milk
  • 6 eggs
  • 1 1/2 cups flour
  • 7 tablespoons sugar
  • Pinch salt 
  • 2 punnet sliced strawberries
For the vanilla pastry cream:
  • 2 cups milk
  • 1 vanilla bean, halved and scraped
  • 6 egg yolks
  • 1/2 cup sugar
  • 1/3 cup cornstarch, sifted
  • 3 1/2 tablespoons butter
For the assembly:
  • Corn oil
  • 2 cups heavy cream
  • 1 tablespoon sugar or more
  • 3 tablespoons Kirsch
  • Confectioners' sugar
1. The day before, make the crepe batter and the pastry cream. Batter: In a small pan, cook the butter until brown like hazelnuts. Set aside. In another small pan, heat the milk until steaming; allow to cool for 10 minutes. In a mixer on medium-low speed, beat together the eggs, flour, sugar and salt. Slowly add the hot milk and browned butter. Pour into a container with a spout, cover and refrigerate overnight.  


2. Pastry cream: Bring the milk with the vanilla bean (and scrapings) to a boil, then set aside for 10 minutes; remove bean. Fill a large bowl with ice and set aside a small bowl that can hold the finished pastry cream and be placed in this ice bath.


3. In a medium heavy-bottomed pan, whisk together the egg yolks, sugar and cornstarch. Gradually whisk in the hot milk, then place pan over high heat and bring to a boil, whisking vigorously for 1 to 2 minutes. Press the pastry cream through a fine-meshed sieve into the small bowl. Set the bowl in the ice bath and stir until the temperature reaches 140 degrees on an instant-read thermometer. Stir in the butter. When completely cool, cover and refrigerate.

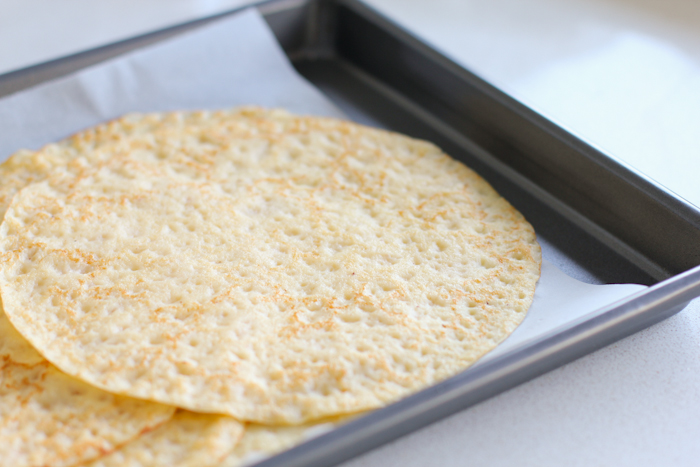
4. Assemble the cake the next day: Bring the batter to room temperature. Place a nonstick or seasoned 9-inch crepe pan over medium heat. Swab the surface with the oil, then add about 3 tablespoons batter and swirl to cover the surface. Cook until the bottom just begins to brown, about 1 minute, then carefully lift an edge and flip the crepe with your fingers. Cook on the other side for no longer than 5 seconds. Flip the crepe onto a baking sheet lined with parchment. Repeat until you have 20 perfect crepes. (Since I cut down the recipe by 2/3, I somehow ended up with ~10 crepes).


5. Pass the pastry cream through a sieve once more. Whip the heavy cream with the tablespoon sugar and the Kirsch. It won’t hold peaks. Fold it into the pastry cream.


6. Lay 1 crepe on a cake plate. Using an icing spatula, completely cover with a very thin layer of pastry cream, then place the sliced strawberries on a thin layer to cover, and then cover with another layer of thin pastry cream. Cover with a crepe and repeat to make a stack of 20 (in my case, 10), with the best-looking crepe on top. Chill for at least 2 hours. Set out for 30 minutes before serving. If you have a blowtorch for creme brulee, sprinkle the top crepe with 2 tablespoons sugar and caramelize with the torch; otherwise, dust with confectioners’ sugar. Slice like a cake.


Read more...

Black Sesame Chiffon Cake

>> Wednesday, July 10, 2013


It was my birthday a few weeks ago. Along with the pre-birthday blues, gifts and well wishes from dear friends and family that this day usually brings, it also came with the reminder just how fast time flies - no wonder the mark a person's life span is usually that quick dash sign '-' between the year of birth and year of death. (What a way to start this post...!) 

Of the many goals I've set for myself at the awareness of this 'flying time', one of them was to pick up my camera again and write. I almost forgot how much I miss interacting and sharing with you on this space!

I confess, being busy wasn't really the only reason why I've been away for some time.


Throughout the past year, I have worked hard, played hard, traveled some, adjusted to changing circumstances, made new friends, mellowed and matured a little bit (hopefully). And in between all these activities, there's been a whole lot of sorrow and a whole lot of gladness. 


With each passing week and month, I became more convinced that I no longer know which buttons to press on my camera. I once visited this space, and could not quite find the voice or words to begin the next post. Strange, isn't it? But I still continued to bake.


Anyways, so I am back! One year older and still just as clumsy at times. You see, this chiffon cake is a bit of a shorty. I was in such hurry to take photos with the limited and setting winter sun over here that I couldn't wait until it has cooled down completely (remember to invert your pan!) so it might have been a bit flat! 

Chiffon cake is really all about the egg whites - if you whip it to the right consistency, you can be sure to have a pillowy soft result! Paired with one of my favourite ingredients, black sesame, I am ready to eat more cakes this winter!

Black Sesame Chiffon Cake

Ingredients:
  •  4 large eggs
  • 100 g cake flour 
  • 40-50g ground black sesame powder
  • 1/3 cup sugar + 4 tablespoon for the egg whites.
  • 1 1/2 teaspoon baking powder 
  • 1/2 teaspoon salt 
  • 1/4 cup vegetable oil (I used grapeseed oil)
  • 1/2 cup full fat milk 
Method:

1. Heat the oven to 325 degrees. In a large bowl, sift together the cake flour, sugar, baking powder and salt. Add the black sesame powder and whisk the dry ingredients well to make sure they are thoroughly combined. Make a well in the center of the dry ingredients.


2. In a small bowl, beat the egg yolks until pale yellow add the vegetable oil slowly. Continue beating until the mixture turns slightly thick.


3. Pour the egg yolks into the well, mix gently and add the milk. Beat the wet ingredients into the dry until completely smooth.


4. In the bowl of a stand mixer or in a large bowl using a hand mixer, beat the egg whites until foamy. With the mixer running, slowly rain in the remaining 4 tablespoon sugar. Continue to beat the whites until stiff peaks form when the beater is lifted.


5. Fold the beaten whites into the rest of the batter by gently spoon one-third at the time. Fold in the white slowly and carefully using a spatula. Be very gentle as you fold in the whites so you not deflate them. Gently fold in the remaining third of the whites. Spoon or gently pour the batter into a 10-inch ungreased angel food cake pan.


6. Place the pan in the middle of the oven and bake for 45 minutes at 160C (325F), and a toothpick inserted into the comes out clean.


7. Remove from heat and invert the pan over an inverted cup. Set the pan aside until cooled completely, 1 to 2 hours.


Read more...

Long time no see & farewell Google Reader!

>> Tuesday, July 2, 2013

Dear Google Reader,


It's going to be sad to see you go.

You've been a part of my morning routine for some time now, usually right after I turn on the laptop and at the same time as those scrambled egg rolls and cuppa hot teas.

And for those brief moments in the day, you would update me on all the latest posts with my favourite blogs always at the top. How considerate! 

We've definitely shared many moments together - laughing, learning, thinking, being challenged and being inspired!

So thank you for your service during those memorable years!

-----

Dear Green Cilantro readers,

I miss you guys. And I promise I will be back very soon with updates :)

Thanks for being patient with me and thank YOU for those nice messages and emails sent my way during the time I've been away. I really do appreciate them...and you!

See you soon.

love,
-Viv

Read more...

Donna Hay's Our Ultimate Chocolate Layer Cake

>> Wednesday, February 15, 2012


It occurred to me the other day how sentimental I can be.  It's not so much that I keep and refuse to part with 'old' things (to some extent, yes), but I do find pleasure in saving things up.

As a child, I used to save the best bits on my plate till last while others around me dig straight into them first...and must confess that I still do e.g. eating the egg whites before the yolks, saving that piece of tender fish cheek (do you do that too?). But I've learnt in the company of certain greedy food-snatching people, it is safer to eat the best bits first ;)

There are certain things in my life which must be done in a certain way or order. And I definitely don't mean in an OCD kind of way. I just think there is a time or season for everything. And we shouldn't skip that warm up or jump to the end of that really good book.


Well this cake was definitely saved to the end of Hawaiian hens party we threw for my sister this past weekend. Yes, it's that cake in the photo above with the orange lily! But it wasn't intentional and was simply left untouched because, well, there was just way too much food! What a shame that we weren't even close to finishing half of the food prepared. To some extent, I was relieved because I wasn't confident at all about how the cake would taste as I am not much of a layered cake with icing type of baker.


So I put the cake back into the fridge after the guests left, unsure what to do with it (eating it all myself did occurr to me but thankfully I had more sense than to listen to that gluttonous voice.) One thing I do dread the most is having leftovers.

Thankfully the next day, all I saw was the last piece of it. Yes, just that piece you see in the photo. The lone orphan of a piece. Turned out my sister took the rest of it to church that day!


So, I systematically turned on the music, made myself some black tea and and curled up on the couch with a plate on my hand.

That's the only way I know to savour that last piece.

p.s. the cake was addictively delicious with the layers of not-too-sweet cream cheese icing (I did adjust the amount)! Keep watch on the oven time for the chocolate cake to make sure it doesn't dry out too much, as I would've preferred the cake just slightly more moist.

p.p.s. I actually halved the cake recipe - the recipe is meant for a 6-layer chocolate cake! That would've been even prettier!

Our Ultimate Chocolate Layer Cake
Donna Hay Magazine Nov 2011 & Channel 7 Sunrise
N.B. I halved the recipe to make it 3 layer chocolate cake.
  • ¾ cup (75g) Dutch cocoa, sifted
  • ¾ cup (180ml) hot water
  • ¾ cup (180g) sour cream
  • 350g butter, softened
  • 2 ¼ cups (495g) caster (superfine) sugar (I reduced it almost half)
  • 1 tablespoon pure vanilla extract
  • 4 eggs
  • 3 cups (450g) plain (all-purpose) flour, sifted
  • 1 teaspoon bicarbonate of (baking) soda
  • cream cheese icing
  • 270g butter, softened
  • 1.5kg cream cheese, softened
  • 3 cups (480g) icing (confectioner’s) sugar mixture, sifted (I reduced it - so instead of the 240g I would use for my half portion, I used < 200g)

Method

1. Preheat oven to 180ºC (350ºF). Place the cocoa and hot water in a bowl and whisk until smooth. Add the sour cream and whisk to combine.

2. Place the butter, sugar and vanilla in the bowl of an electric mixer and beat for 4 minutes or until pale and creamy. Gradually add the eggs and beat well to combine. Set the mixer to low speed, add the cocoa mixture, flour and bicarbonate of soda and beat until well combined.

3. Divide the mixture between 2 x 20cm-round lightly greased cake tins lined with non-stick baking paper.

4. Bake for 50–55 minutes or until cooked when tested with a skewer. Allow cakes to cool in tins for 10 minutes before turning out onto a wire rack to cool completely. Trim the tops from the cakes to create a flat surface. Slice each cake evenly into 3 horizontal slices.


While the cakes are baking, make the cream cheese icing.

5. Place half the butter and cream cheese in an electric mixer and beat for 8–10 minutes or until pale and creamy. Add half the icing sugar mixture and beat for a further 8–10 minutes or until pale and fluffy. Repeat with remaining butter, cream cheese and sugar. Using a palette knife, spread 1 cake layer with cream cheese icing and top with another cake layer.

6. Repeat with remaining layers and more icing, reserving enough icing for the sides and top of the cake. Spread the sides and top of the cake with the remaining icing.


Serves 6–8. Tip: Use a palette knife to ‘drag’ the icing up the sides of the cake for a smooth finish.


Oh, and Happy Valentine's Day! :)

I've always loved reading this story. Good reminder that love isn’t worthy of the name if we aren’t willing to share it with everyone.


Read more...

Korean BBQ Wings - Flavor Forecast 2012

>> Wednesday, February 1, 2012


I have discovered this week:

*I'm slowly losing my resistance - it’s about time for me to get a smartphone…like one where you can actually whatsapp people the photos you've taken throughout the day or navigate yourself out of being lost in the city.

*Purple is so not in at the moment.  I have struggled like never before to find a purple bridesmaid dress!

*The last thing I want to do after a long day at work is to come home and sit in front of the computer…I feel terrible about the emails to be sent and comments to be replied...

*The very first frangipani flower appeared on our balcony...aloha!


*It’s now February…no more excuses for putting things off just because “it’s still the beginning of the year.”

*I am supposedly chronically allergic to peanut butter and milk (according to a recent blood test). I wonder if I’d puff up if I have a peanut butter milkshake!

*This flavour combo – Korean Pepper paste with Sesame, Asian pear and Garlic is kinda amazing on my palate.


Remember the McCormick Flavor Forecast I posted a few weeks back, where I told you how I really wanted to try this flavour combo?

It's garlicky, peppery, slightly hot, sweet...and juicy (from the pear!)

Totally Tuesday night kinda food as you repeatedly wonder why it's not even half way through the week yet. It sure feels like a Friday to me!


Just mix together the Korean pepper sauce, garlic, ginger, honey, soy sauce, and a bit of sesame oil into a bowl.


Toss the wings/drumsticks into the marinade and refrigerate for 30 minutes (the longer the better!)

(I'm feeling uneasy putting photos up of uncooked chicken as this is mostly a flour-butter-eggs-sugar kinda blog...)


Bake (then grill, which I didn't) and enjoy!

I can see why people love this flavour combo! The juicy sweetness from the pear along with the garlicky Korean pepper sauce causes some serious finger licking actions until you find yourself with an empty plate in front of you on a feels-like-a-Friday Tuesday night!

Hurry up weekend. Come already!


"Korean BBQ meets Buffalo wings. These succulent finger foods are served with crunchy Asian pear to create a unique flavor adventure."

Korean BBQ Wings
Makes 12 appetizer servings.
  • 1/2 cup (125 mL) Korean pepper paste (Gochujang)
  • 1/2 cup (125 mL) soy sauce
  • 1/4 cup (60 mL or 85 grams) honey
  • 2 tablespoons (30 mL or 20 grams) minced garlic
  • 2 tablespoons (30 mL) sesame oil
  • 1 teaspoon (5 mL or 2 grams) McCormick® Ground Ginger
  • 4 pounds (2 kilograms) chicken wing pieces (I used both drumsticks and wings)
  • 1 Asian pear
  • 2 green onions, thinly sliced
  • 1 tablespoon (15 mL or 7 grams) McCormick® Sesame Seed
1. Mix hot pepper paste, soy sauce, honey, garlic, sesame oil and ginger in medium bowl until well blended. Place chicken in large resealable plastic bag or glass dish. Add 1/2 cup (120 mL) of the marinade; toss to coat well. Refrigerate 30 minutes. Reserve remaining marinade.


2. Remove chicken from marinade. Discard any remaining marinade. Place chicken on shallow foil-lined large baking pan. Bake in preheated 375°F (190°C, Gas Mark 5) oven 30 minutes, turning chicken halfway through cooking.
3. Meanwhile, quarter and core the Asian pear. Cut each quarter into 3 pieces. Place pear slices in large bowl. Add cooked chicken and 1/2 of the reserved marinade; toss to coat well.
4. Grill chicken and pear slices over medium-high heat 5 minutes or until grill marks appear, turning occasionally. Toss chicken and pear slices with remaining reserved marinade in large bowl. Sprinkle with green onions and sesame seed.
Test Kitchen Tips:
  • Gochujang or Korean pepper paste is made from chile powder, glutinous rice powder, fermented soybeans and salt. It is used to flavor stews, soups and marinades, and as a condiment at the table. It is available in Asian markets and online specialty stores.
  • Chicken wings may be grilled without prebaking. Grill marinated chicken over medium-high heat 15 to 18 minutes until cooked through, turning frequently. Grill pear slices as directed, brushing with 2 tablespoons of the reserved marinade. Continue as directed.

Read more...

Cranberry and Pistachio Biscotti

>> Wednesday, January 25, 2012


The first few weeks at a new work place is always awkward.

If you've never felt this way then you are probably less socially awkward than I am. Any tips appreciated!

I am terrible at chit-chats especially in the elevator or other confined spaces (e.g. bathroom). I never know what to say after that nice-to-meet-you handshake (I'm proud of my firm-not-sloppy handshake but not the subsequent awkwardness that follows). And I am embarrassed to admit that many colleagues are still addressed as "...hey!", where the "..." refers to the moment of silence where I frantically try to recall their names.


But besides these rather gawky experiences, I have every reason to feel thankful...for the job, the colleagues, for the opportunities to learn, to grow and to break (myself, hopefully not things/computers/people), to be of influence (however big or small!) and to able to support myself financially. And obviously for the people who support and pray for me!


On a different note, I made this rather exotic yet comforting Blueberry-Cardamom Mexican Atole (pictured above!) from McCormick's Flavor Forecast on Chinese New Year's Eve (we really lack tradition in my family). Atole is a warm sweet masa drink from Mexico traditionally served at breakfast - why haven't I discovered you earlier?


Aaaaannnd, yesterday these deliciously crunchy (and festively looking!) biscottis were made in a rush after work and just before dinner and the summer sunset. They were accompanied by a mug of Mother's rather strange but healthy concoction of red bean, mung bean and barley drink...not coffee!

I did mention we're not a traditional bunch, right?


Cranberry and Pistachio Biscotti
Donna Hay Magazine Dec 2012
Makes 80
  • 2 cups plain flour, sifted 
  • 1 1/2 tsp baking powder sifted 
  • 3/4 cup caster sugar 
  • 3 eggs, lightly beaten 
  • 2 tsp vanilla extract 
  • 1 tbsp finely grated orange rind
  • 1 cup sweetened, dried cranberries 
  • 1 cup shelled unsalted pistachios  
1. Preheat oven to 160deg. Place flour, baking powder and sugar into a bowl and mis to combine.


2. Add eggs, vanilla, orange rind (I used Lemon), cranberries and pistachios and mix until you form a dough


3. Turn the dough out onto a table and with some flour, knead until smooth.

4. Form into two logs and flatten slightly. Bake in oven on two lined baking trays for 30-35 minutes or until firm cool completely.

5. When cooled use a serated knife to cut thin slices and place them back on baking trays. bake for a further 8-10 minutes until crisp. cool on trays.


Read more...

Easy Butter Toffee Sauce & McCormick's Flavor Forecast 2012!

>> Sunday, January 15, 2012


Hello new year and hello you!

I've missed you...and my laptop (I've been without it for almost 2 months!)

I won't start the first post of the year with my New Year's goals...or resolutions as I did last year. (Definitely not because they are yet accomplished...)


Thinking back, Twenty Eleven (2011) saw me learning that edamame tastes pretty good in almost anything and that papaya and pineapples together can actually make your taste buds sing. So many food combinations tried and tested over that year...and shared/loved/made over and over again!

Makes me look forward to all the new flavour combos you and I will discover this year.


I think the team of experts from Flavor Forecast 2012 might know a bit more about all the trendy and inspiring flavours of 2012 than I as they have been engaged in a year-long process of identifying culinary trends!

I am writing this post in partnership with McCormick's Spice as they launch Flavor Forecast 2012. Here on this space, you know (if you've been visiting long enough) I don't normally promote commercial products - this is simply a space where I share with you what goes on in that corner of my heart and apartment where food of all sorts come out.

But as an user of the McCormick spices on a daily basis and being genuinely interested in this launch - I'd love to share with you the new flavour combos they've come up with. Coz, sharing is caring (just what my sister said to me today when I refused to lend her my cute top...)

So what is Flavor Forecast, you ask? (#You type flavor, I type flavour...)

It's essentially a forecast of the future of flavour! Or, an annual report compiled by McCormicks chefs and trend trackers that tells us what is new and trendy in the food scene this year globally!

So on their site, they've put together this great guide of flavour trends of 2012 and recipes for those flavour combinations to try. I hope you do check them out if interested. The Butter Toffee sauce I've made is from the site as well. I've been spooning on it tonight while watching TV :) It's even better than a tub of ice-cream (together would be unbeatable uh huh!)

I've attached a few of the flavour combos I find most interesting below:


Check out recipes using:

Ginger with Coconut here

Red Tea with Cinnamon & Plum here


This is definitely the flavour combo I'm most keen to try myself!!!

Korean Pepper Paste with Sesame, Asian Pear & Garlic recipes here


Check out recipes using:

Vanilla with Butter here (the Easy Butter Toffee Sauce is from here :)
Blueberry with Cardamom & Corn Masa here

For the rest of the flavour combinations of 2012, go to Flavor Forecast!

These five (5) really pretty photos above are courtesy of their website too.


Easy Butter Toffee Sauce
Recipe from here

"This toffee sauce is a snap to prepare. It elevates ice cream and sweet treats like brownies and cakes with rich, buttery flavor"

Prep Time: 5 minutes
Cook Time: 10 minutes

Ingredients
  • 1/2 cup (1 stick) (125 mL or 112 grams) butter
  • 1/2 cup (125 mL or 100 grams) sugar
  • 1/2 cup (125 mL) heavy cream
  • 1/2 teaspoon (3 mL) McCormick® Pure Vanilla Extract
1. Place butter and sugar in medium saucepan on medium heat. Cook and stir until mixture turns a deep amber color.

2. Carefully stir in cream and vanilla. (Mixture will be bubbly.) Whisking constantly, cook until sauce thickens and coats back of spoon.

Makes 1 cup or 8 (2-tablespoon) servings.

~*~*~*~*~*~*~*~*~*~*~*~*~*~*~*~*~*~*~*~*~


Anyways, it's great to be BACK in the blogging world and speaking to you about food once again!

New friends - nice to meet you and please make yourself at home :)

Old friends - thanks so much for returning and discovering with me.

Happy new week ahead...

P.S I start a new job tomorrow - hope to return with positive news ;)

Read more...
Related Posts with Thumbnails

  © Blogger template Simple n' Sweet by Ourblogtemplates.com 2009

Back to TOP