Showing posts with label cake. Show all posts

Strawberry Gâteau de Crêpes

>> Sunday, July 28, 2013


It all started with a “I’m not in a mood for the usual cakes” type of gchat conversation with my sister whose taste buds have changed drastically ever since she started eating for two. 
 
“But make me something different, I'm craving for something sweet”.


Being at work, I tried to recall what I have in the pantry and fridge at home. Have they invented a refrigerator with scanners attached telling me what I have in stock at the touch of my mobile app? Mental note to self - if not, must look into it when I get home and patent the idea asap.

When I did get home, I acknowledged that ideas I come up with at work are sometimes not the best and I also decided to make a crepe cake. That was the better of the two.

 
This strawberry crepe cake is something that can be made with your usual kitchen staples...and some strawberries of course. I found out that in Australia, strawberries are in season today and everyday as they are farmed around the country in different climatic regions. How lucky we are living here!


This cake reminds of my childhood. When I was a young girl, I was never into cakes or desserts. Until one day, I walked past a fancy cafe in a department store in Taiwan and my eyes caught sight of a very similar strawberry crepe cake - it was the most beautiful cake I'd ever seen. I could not even begin to count how many even layers of golden soft crepes were sandwiching the ruby red strawberries sliced with such precision and the oozing pale cream. And so I just stood there, eating with my eyes until my mum whisked me away to run some errands.
 
I did go back to the same place a few years later. It certainly didn't taste as good as I had it in my head after all those time. But I can assure you that this one here, 20-something years later, definitely tastes like what it should have (although it does not look as good - the pastry cream did not have time to set in the fridge!)


These crepes are easy to make - you don't even need a crepe pan. I used my normal pan/wok and just measured the batter (1/3 cup) to make sure each layer is the same size.  The sweet, juicy and tart strawberries and the not-too-sweet pastry cream makes for the best paring. I made the crepe batter and the pastry cream the day before, making the assembling day a breeze!


Note: I cut the recipe below down completely by 2/3, resulting in around 10 crepes!

Strawberry Mille Crepes Cake (Gâteau de Crêpes)
Adapted from New York Times who adapted the batter from ”Joy of Cooking” and the pastry cream from ”Desserts,” by Pierre Herme and Dorie Greenspan. 

For the crepe batter:
  • 6 tablespoons butter
  • 3 cups milk
  • 6 eggs
  • 1 1/2 cups flour
  • 7 tablespoons sugar
  • Pinch salt 
  • 2 punnet sliced strawberries
For the vanilla pastry cream:
  • 2 cups milk
  • 1 vanilla bean, halved and scraped
  • 6 egg yolks
  • 1/2 cup sugar
  • 1/3 cup cornstarch, sifted
  • 3 1/2 tablespoons butter
For the assembly:
  • Corn oil
  • 2 cups heavy cream
  • 1 tablespoon sugar or more
  • 3 tablespoons Kirsch
  • Confectioners' sugar
1. The day before, make the crepe batter and the pastry cream. Batter: In a small pan, cook the butter until brown like hazelnuts. Set aside. In another small pan, heat the milk until steaming; allow to cool for 10 minutes. In a mixer on medium-low speed, beat together the eggs, flour, sugar and salt. Slowly add the hot milk and browned butter. Pour into a container with a spout, cover and refrigerate overnight.  


2. Pastry cream: Bring the milk with the vanilla bean (and scrapings) to a boil, then set aside for 10 minutes; remove bean. Fill a large bowl with ice and set aside a small bowl that can hold the finished pastry cream and be placed in this ice bath.


3. In a medium heavy-bottomed pan, whisk together the egg yolks, sugar and cornstarch. Gradually whisk in the hot milk, then place pan over high heat and bring to a boil, whisking vigorously for 1 to 2 minutes. Press the pastry cream through a fine-meshed sieve into the small bowl. Set the bowl in the ice bath and stir until the temperature reaches 140 degrees on an instant-read thermometer. Stir in the butter. When completely cool, cover and refrigerate.

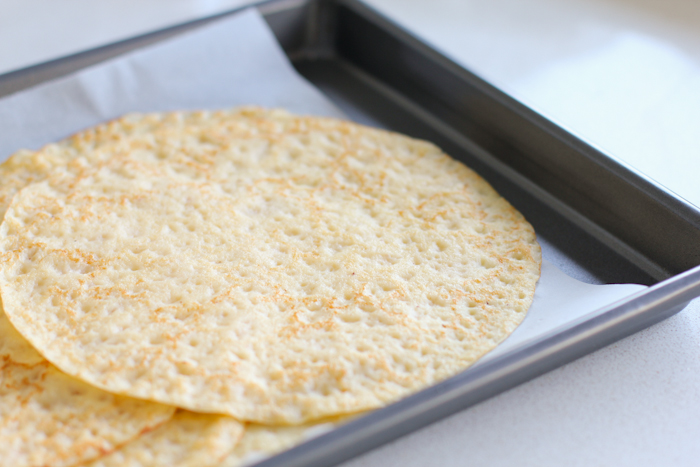
4. Assemble the cake the next day: Bring the batter to room temperature. Place a nonstick or seasoned 9-inch crepe pan over medium heat. Swab the surface with the oil, then add about 3 tablespoons batter and swirl to cover the surface. Cook until the bottom just begins to brown, about 1 minute, then carefully lift an edge and flip the crepe with your fingers. Cook on the other side for no longer than 5 seconds. Flip the crepe onto a baking sheet lined with parchment. Repeat until you have 20 perfect crepes. (Since I cut down the recipe by 2/3, I somehow ended up with ~10 crepes).

5. Pass the pastry cream through a sieve once more. Whip the heavy cream with the tablespoon sugar and the Kirsch. It won’t hold peaks. Fold it into the pastry cream.


6. Lay 1 crepe on a cake plate. Using an icing spatula, completely cover with a very thin layer of pastry cream, then place the sliced strawberries on a thin layer to cover, and then cover with another layer of thin pastry cream. Cover with a crepe and repeat to make a stack of 20 (in my case, 10), with the best-looking crepe on top. Chill for at least 2 hours. Set out for 30 minutes before serving. If you have a blowtorch for creme brulee, sprinkle the top crepe with 2 tablespoons sugar and caramelize with the torch; otherwise, dust with confectioners’ sugar. Slice like a cake.


Read more...

Donna Hay's Our Ultimate Chocolate Layer Cake

>> Wednesday, February 15, 2012


It occurred to me the other day how sentimental I can be.  It's not so much that I keep and refuse to part with 'old' things (to some extent, yes), but I do find pleasure in saving things up.

As a child, I used to save the best bits on my plate till last while others around me dig straight into them first...and must confess that I still do e.g. eating the egg whites before the yolks, saving that piece of tender fish cheek (do you do that too?). But I've learnt in the company of certain greedy food-snatching people, it is safer to eat the best bits first ;)

There are certain things in my life which must be done in a certain way or order. And I definitely don't mean in an OCD kind of way. I just think there is a time or season for everything. And we shouldn't skip that warm up or jump to the end of that really good book.


Well this cake was definitely saved to the end of Hawaiian hens party we threw for my sister this past weekend. Yes, it's that cake in the photo above with the orange lily! But it wasn't intentional and was simply left untouched because, well, there was just way too much food! What a shame that we weren't even close to finishing half of the food prepared. To some extent, I was relieved because I wasn't confident at all about how the cake would taste as I am not much of a layered cake with icing type of baker.


So I put the cake back into the fridge after the guests left, unsure what to do with it (eating it all myself did occurr to me but thankfully I had more sense than to listen to that gluttonous voice.) One thing I do dread the most is having leftovers.

Thankfully the next day, all I saw was the last piece of it. Yes, just that piece you see in the photo. The lone orphan of a piece. Turned out my sister took the rest of it to church that day!


So, I systematically turned on the music, made myself some black tea and and curled up on the couch with a plate on my hand.

That's the only way I know to savour that last piece.

p.s. the cake was addictively delicious with the layers of not-too-sweet cream cheese icing (I did adjust the amount)! Keep watch on the oven time for the chocolate cake to make sure it doesn't dry out too much, as I would've preferred the cake just slightly more moist.

p.p.s. I actually halved the cake recipe - the recipe is meant for a 6-layer chocolate cake! That would've been even prettier!

Our Ultimate Chocolate Layer Cake
Donna Hay Magazine Nov 2011 & Channel 7 Sunrise
N.B. I halved the recipe to make it 3 layer chocolate cake.
  • ¾ cup (75g) Dutch cocoa, sifted
  • ¾ cup (180ml) hot water
  • ¾ cup (180g) sour cream
  • 350g butter, softened
  • 2 ¼ cups (495g) caster (superfine) sugar (I reduced it almost half)
  • 1 tablespoon pure vanilla extract
  • 4 eggs
  • 3 cups (450g) plain (all-purpose) flour, sifted
  • 1 teaspoon bicarbonate of (baking) soda
  • cream cheese icing
  • 270g butter, softened
  • 1.5kg cream cheese, softened
  • 3 cups (480g) icing (confectioner’s) sugar mixture, sifted (I reduced it - so instead of the 240g I would use for my half portion, I used < 200g)

Method

1. Preheat oven to 180ºC (350ºF). Place the cocoa and hot water in a bowl and whisk until smooth. Add the sour cream and whisk to combine.

2. Place the butter, sugar and vanilla in the bowl of an electric mixer and beat for 4 minutes or until pale and creamy. Gradually add the eggs and beat well to combine. Set the mixer to low speed, add the cocoa mixture, flour and bicarbonate of soda and beat until well combined.

3. Divide the mixture between 2 x 20cm-round lightly greased cake tins lined with non-stick baking paper.

4. Bake for 50–55 minutes or until cooked when tested with a skewer. Allow cakes to cool in tins for 10 minutes before turning out onto a wire rack to cool completely. Trim the tops from the cakes to create a flat surface. Slice each cake evenly into 3 horizontal slices.


While the cakes are baking, make the cream cheese icing.

5. Place half the butter and cream cheese in an electric mixer and beat for 8–10 minutes or until pale and creamy. Add half the icing sugar mixture and beat for a further 8–10 minutes or until pale and fluffy. Repeat with remaining butter, cream cheese and sugar. Using a palette knife, spread 1 cake layer with cream cheese icing and top with another cake layer.

6. Repeat with remaining layers and more icing, reserving enough icing for the sides and top of the cake. Spread the sides and top of the cake with the remaining icing.


Serves 6–8. Tip: Use a palette knife to ‘drag’ the icing up the sides of the cake for a smooth finish.


Oh, and Happy Valentine's Day! :)

I've always loved reading this story. Good reminder that love isn’t worthy of the name if we aren’t willing to share it with everyone.


Read more...

Flour's Classic Carrot Cake

>> Thursday, September 8, 2011


One of the many reasons I try to take my camera everywhere with me is because it makes me look for opportunities to capture some of the hidden beauty in the world that is sometimes overlooked as the mundane and ordinary. I think sometimes we don't expect to see beauty in the unexpected places. But isn't it usually there that we often see it shining through the most?

There are times however where those unanticipated beauty cannot be captured by the camera. They might be in words overheard on the train, gestures seen in the elevator, or feelings expressed over a cup of hot chocolate. But I'm not too good with capturing those kind of moments with words. 


I took the following photos recently...they are not what you might call beautiful or great shots by any stretch but the stories and moments associated with them are.


Carrot cakes are my replacement banana cakes in the days when bananas are still over ten dollars per kilo. Like banana cakes, they are non-fussy and non-pretentious. You eat them for what they are and not because how they look. 


I recently bought Joanne Chang's Flour cookbook which proved to be a lot of fun reading especially the stories associated with each of the recipes. But to be honest I wasn't thrilled initially when I flipped it through as it was loaded with recipes that I don't normally like to make...well just treats which require a lot of ingredients that I try to minimize in my diet (which rules out most of the delicious baked goodies I know!) But after trying a few recipes here and there with everything turning out delicious, I realised that maybe I just needed to learn portion control. Or give away the cake as soon as I take a slice. (Which didn't happen this this case unfortunately....)


This carrot cake is the best I've made (yes, even compared Sydney's own Bourke Street Bakery version I made last year). It is everything I want a carrot cake to be: loads of shredded carrots for that moist crumbly texture, just the right portion of spices, juicy sweet raisin and crunchy walnuts. I don't normally frost my carrot cakes but this time I followed through the recipe and just decreased the icing sugar amount by a little bit. And instead of a thick layer of frosting in the middle layer of the cake, I just had a thin-ish layer of it - which was just the right amount for me!


Classic Carrot Cake
Adapted from Flour by Joanne Chang
Makes one 8-inch, 2-layer cake
Or 12 cupcakes
For the carrot cake:
  • 2 eggs
  • 1 cup (220 grams) packed light brown sugar
  • 3/4 cup (150 grams) canola oil
  • 3 tablespoons nonfat buttermilk
  • 1/2 teaspoon vanilla extract
  • 1 cup plus 2 tablespoons (160 grams) unbleached all-purpose flour
  • 1/2 teaspoon baking powder
  • 1/2 teaspoon baking soda
  • 1/2 teaspoon ground cinnamon
  • 1/4 teaspoon ground ginger
  • 2 cups (260 grams) tightly packed shredded carrots
  • 1/2 cup (80 grams) raisins
  • 1/2 cup (50 grams) walnuts, toasted and chopped
For the cream cheese frosting:
  • 12 ounces (340 grams) cream cheese, left at room temperature for 4 hours
  • 1/2 cup (1 stick/114 grams) unsalted butter, at room temperature
  • 1 2/3 cups (230 grams) confectioners' sugar

For the carrot cake:

1. Position a rack in the center of the oven, and heat the oven to 350 degrees. Butter and flour an 8-inch cake pan (or line a standard 12-cup muffin tin with paper liners).
2. Using a stand mixer fitted with the whip attachment (or a handheld mixer), beat together the eggs and brown sugar on medium-high speed for 3–4 minutes, or until the mixture is light and thick. (This step will take 8–10 minutes if using a handheld mixer.) In a small bowl or pitcher, whisk together the oil, buttermilk, and vanilla. On low speed, slowly pour the oil mixture into the egg-sugar mixture. This should take about 30 seconds.
3. In a small bowl, sift together the flour, baking powder, baking soda, salt, cinnamon, and ginger. Using a rubber spatula, fold the flour mixture into the egg-sugar mixture. When most of the flour mixture has been incorporated, add the carrots, raisins, and walnuts and continue to fold until the batter is homogenous. Pour the batter into the prepared cake pan (or divide evenly among the prepared muffin cups).
4. Bake the cake flour for about 1 hour and 20 minutes (or the cupcakes for about 50 minutes), or until the top is golden brown and springs back when pressed in the middle with a fingertip. Let cool completley in the pan on a wire rack.
For the cream cheese frosting:
5. While the cake is baking, put the cream cheese in the stand mixer fitted with the paddle attachment, and beat on medium speed for about 1 minute, or until smooth. If you have forgotten to take the cream cheese out of the refrigerator 4 hours in advance, you can softren it in a microwave on medium power for 30 seconds. Add the butter and continue to beat for another 1 minute. Scrape the sides and bottom of the bowl and add the confectioners' sugar. Beat for 1 more minute, or until well mixed. You should have about 3 1/2 cups.
6. Cover the frosting and refrigerate for 2–3 hours before using to allow it firm up enough to pipe and spread. (The frosting can be made up to 5 days in advance and stored in an airtight container in the refrigerator.)

7. Remove the cake from the pan and split it into two layers. Place the bottom layer, cut-side up, on a cake plate. Spoon about half of the frosting onto the layer and, using an offset spatula, spread it evenly to the edges. Place the top layer, cut-side down, on top and press down to adhere. Spoon on about 1 cup of the frosting and spread it over the top and down the sides of the cake. This is the crumb coat which will keep any loose crumbs from migrating to the surface of the finished cake. Spoon the remaining frosting on top of the cake, and spread it evenly across the top and down the sides.

(If you have baked cupcakes, remove them from the muffin tin. Fit a pastry bag with a 1/2-inch star tip and fill the bag with the frosting, then pipe the frosting onto the cupcakes. Or, spread the frosting on the cupcakes with an icing spatula.
8. The cake (or cupcakes) can be stored in an air-tight container in the refrigerator for up to 3 days. It is best served a littel cooler than room temperature, so remove it from the refrigerator about 2 hours before serving.


...and provide for those who grieve in Zion — 
to bestow on them a crown of beauty instead of ashes
the oil of joy instead of mourning, 
and a garment of praise instead of a spirit of despair. 
They will be called oaks of righteousness,  
a planting of the LORD for the display of his splendor.

 -Isaiah 61:3

Read more...

Heidi's Oat Cakes

>> Tuesday, July 12, 2011


Dear sweet old elegant lady at the park,

I'm glad our paths crossed today. 

You were on your afternoon stroll when you saw me taking photos of flowers (roses, specifically), because that's what I do when I need to clear my head.


You must've been intrigued as you walked over and struck up a conversation with me. Am I a high school student, you asked. I didn't know whether to take that as a compliment or as a sign to consider a wardrobe makeover. For the sake of my wallet, I picked the former.

You adore roses, you said. Especially ones so dark, rich and deep in colour, because they have the best smelling perfume in the world. You walked over to a naked patch of the garden where only 1 red rose still stands, the rest all stems and thorns - a consequence of this unforgiving winter. This is undoubtedly the best patch during blooming seasons and you said you could never walk past without dipping your nose into them all. Your eyes twinkled then!

Store bought roses are just not the same, they lack in real rose scents. I nodded in agreement.


So it turned out we have a few things in common. Well, for one, we are both terrible gardeners but we love strolling in the park to appreciate the hard work of other gardeners!

Then you told me to wait. What for?

Wait until the summertime when everything will be back to normal again. The richly perfumed flowers will fill the entire garden and it'll be so fragrant that just one sniff is like drowning in a glass of red wine, in your own words.

(I will remember to check there are no insects/bees hiding inside the roses before I smell - thanks for the heads up.)

It seems a long way away, summer, doesn't it? Especially on days when we're bundled up from head to toes and still feeling like popsicles. But experiences from previous years comfort us - it'll come before we know it.


So I told you that I will wait with happy anticipation.

I don't know if our paths will cross again. If they do, I will definitely bring you a tray of these flaxseed oat cakes one day. I just have a strong feeling that you'd totally dig this wonderfully fragrant and healthy (bonus!) treat as I have! 

Thanks for being part of my life today.

Yours sincerely,

The 'high-schooler' with the camera.


This recipe is from Heidi's new cookbook Super Natural Everyday (I've doggy-eared so many pages!). These oat cakes are on the dense/heavy side, really moist and filled with chunky bits of walnuts and deliciously scented by the coconut oil and maple syrup. They are filling too, in a good way of course :) These will be making many many more appearances in my kitchen for sure, and I hope yours too.


Oat Cakes (oats, flax seeds, walnuts)
From Super Natural Everyday via 5 Second Rule
Makes 12 oat cakes
  • 3 cups / 10.5 oz / 300 g rolled oats
  • 2 cups / 8 oz / 225 g spelt flour or whole wheat pastry flour
  • 1/2 teaspoon aluminum-free baking powder
  • 2 teaspoons fine-grain sea salt
  • 1/4 cup / 1.5 oz / 45 g flax seeds
  • 3/4 cup / 3 oz / 85 g chopped walnuts, lightly toasted
  • 1/3 cup / 2.5 oz / 70 g extra-virgin coconut oil
  • 1/3 cup / 3 oz / 85 g unsalted butter
  • 3/4 cup / 180 ml maple syrup
  • 1/2 cup / 2.5 oz / 70 g natural cane sugar (I omitted this as the maple syrup is already really sweet)
  • 2 large eggs, lightly beaten
1. Preheat the oven to 325°F / 160°C with a rack in the top third of the oven. Butter a standard 12-cup muffin pan.

2. Combine the oats, flour, baking powder, salt, flax seeds, and walnuts in a large mixing bowl.

3. In a medium saucepan over low heat, combine the coconut oil, butter, maple syrup, and sugar and slowly melt together. Stir just until the butter melts and sugar has dissolved, but don’t let the mixture get too hot. You don’t want it to cook the eggs on contact in the next step.


4. Pour the coconut oil mixture over the oat mixture. Stir a bit with a fork, add the eggs, and stir again until everything comes together into a wet dough. Spoon the dough into the muffin cups, nearly filling them.


5. Bake for 25 to 30 minutes, until the edges of each oatcake are deeply golden. Remove the pan from the oven and let cool for a couple minutes. Then, run a knife around the edges of the cakes and tip them out onto a cooling rack. Serve warm or at room temperature.


~*~*~*~**~*~*~*~*~**~*~*~*~*~**~*~*~*~*~*~*

I've finally gotten around to numbering each of the eligible entries for the Baker's Delight Challenge!

(Terribly late I know!)

The 3 winners are:

hy
2 fit and fun gals
Anh

Will email you all soon :)


~*~*~*~**~*~*~*~*~**~*~*~*~*~**~*~*~*~*~*~*


Hope you smile today and come across nice people in your path too this week!

Read more...

Black Sesame Brownies

>> Wednesday, April 20, 2011


Obsession: Black sesame.

Confession #1: Not a big fan of chocolate (except dark bitter ones).

Confession #2: Craves comfort food on cooler days. Please come back soon summer.


Confession #3: Get emotional when watching home renovation T.V shows as if I'm the owners of the house. I'm just kidding...hmmm really.

Conclusion: Black sesame brownie seems like a pretty swell idea.

Not convinced? 

Here is why I like black sesame...

- Keeps my hair black and shiny (although I may be too young to be graying)
- Are full of healthy goodness - calcium and magnesium amongst others.
- Will likely to never go out of fashion (little black dress, black cats, black Fridays)
- Tastes good...have you tried black sesame ice-cream?


And...how about black sesame paste

You can get these thick puree of roasted black sesame seed in a jar from good Asian/Japanese stores (I bought mine on my last trip to Japan - it seems smoother). I usually use it as a spread on my toast in the morning when I need a break from peanut butter.

Check out the comparisons...are you a crunchy or smooth type of person?


Anyways, this brownie is moist, slightly buttery and dense (but more cake-y than fudge-y). The sesame flavour is incredibly strong and having a slice or two is likely to make you fall in love with black sesame (if you don't already). Instead of salt in most chocolate brownie recipes to heighten the flavour, this recipe calls for soy sauce instead. Surprise much? This is definitely a very much Asian inspired type of brownie :)

You're of course welcome to use your favourite brownie recipe too but just substitute the chocolate for the sesame paste!


Black Sesame Brownies
Inspired from an old Japanese cookbook
Makes a square tin (or loaf tin)
  • 80g unsalted butter (room temperature)
  • 40g sugar (I used 25g - check whether your sesame paste is already sweetened or not)
  • 2 egg yolks
  • 40g black sesame paste
  • 1/4 tsp soy sauce
  • 1 egg white
  • 10g caster sugar
  • 50g flour (All purpose)
  • 1/4 tsp baking powder
  • 1 tbsp black sesame (to sprinkle on top)

1. In a bowl, cream the butter with an electric mixer on low, until it lightens in colour and texture then add the sugar (40g) and carefully combine.

2. Add in the yolk one by one, making sure to fully blend into the mixture before each addition.

3. Add the black sesame paste and soy sauce into the mixture.

4. In a clean bowl, beat the egg white with the remaining sugar (10g) with a hand mixer until the egg white is fluffy and does not fall when you tip the bowl upside down.

5. Combine and sift the flour with the baking powder. Add half the meringue/whipped egg white into the black sesame mixture as well as half the flour mixture. Use a rubber spatula to fold and combine.


6. Further beat the meringue until stiff and finer in texture, then add into the black sesame mixture along with the remaining flour and baking powder. Fold and combine.


7. Add the mixture into a brownie tin, and sprinkle the black sesame seeds on the batter. Bake for 15 minutes at 150C.


8. After it cools down a bit, slice and serve!


Somehow I failed to notice that my previous post was the 100th (HUNDREDTH!) post - which makes this the 101th post!

Yay! Glad I started this blog and glad that it's still here!

Thanks for coming to visit...definitely wouldn't have been the same without you! So thanks again - wish I could share this brownie with you too :D

Read more...
Related Posts with Thumbnails

  © Blogger template Simple n' Sweet by Ourblogtemplates.com 2009

Back to TOP